

About This Station
The station is powered by a Davis Vantage Pro 2 weather station. The data is collected every 2 seconds and the site is updated every 15 minutes non Real-time and 4 seconds(realtime). This site and its data is collected using Weather-Display Software. The station is comprised of an anemometer, a rain gauge and a thermo-hydro sensor situated in optimal positions for highest accuracy possible.
The station has been operating since 2006 and uploads to various sites including the UK's Met Office.
I am also a member of the Royal Meterological Society.
The Merseyside Weather Station is situated at 53'20'54 N , -3'00'32 W at a altitude of 39 M (128ft) above mean sea level
This site currently hosted by freeola. This includes webspace that has an unlimited storage capacity. Also unlimited emails and no bandwidth limitations this service comes from freeola.The weather station has an extra sensor consisting of a solar radiation sensor. the equipment came from the UK weathershop based in eastborne.
The computer specifications are the following. 1u Rack mount Dell R310 Server running Windows Server 2016 with Weatherlink, Weather display being the primary software operating the website Virtual VP allows multiple programs to talk to the weather station at the same time. This machine has 12gb of ECC (Error Correcting) Memory, Intel Xeon CPU, Redundant Power Supply 1kw each and the storage drives are in a Raid 1 mirroring congifuration. the power supply is backed up via a Trust 1300VA (800 Watt) UPS (Uninteruptable power suply) incase of mains failure. It will support the server and weather station for upto 33 minutes before safely shutting down the Server.
The Ip Camera is a Axis 211 Ip webcam directly connected to our router and switchgear This webcam retails for £400 It has a maximum capacity of 20 viewers after this a blank image will be displayed and you will be requested to come back later for live feeds.
About Me
My name is steve born in 1991 and lived in Bebington all my life. My first touch with the weather was a small wireless setup which i read daily readings from. Until i descovered Davis Vantage Pro stations in 2006. The start of this website began its jorney on weather underground using nothing more than Weatherlink.
At the time Weatherlink did everything i needed it to. Alan Paul from upminster helped me with my solar sensor settings and has helped me ever since. You can see his website by visiting our links page.
The Late Andrew Morse of Prestatyn Weather i met when i was working on a weather related project around 2009. And helped train me in running a Met office station in Prestatyn. He also helped get the previous website design. And get me involved with The Royal Meterological Society. This organistation has really expanded my knowlege on the weather and weather systems
Phil of Newquay Weather has helped the website and station come on leaps and bounds by coaching me on the PHP Website Lanuage.
A massive thanks is owed to those who have helped me over the years and there websites can be viewed on the links page, Including the former BBC website of the Events of when Prestastyn Flooded in the 1990's
About This town
Bebington is on the eastern side of the Wirral Peninsula, approximately 10 km (6.2 mi) south-south-east of the Irish Sea at New Brighton, about 7.5 km (4.7 mi) east-north-east of the Dee Estuary at Gayton and less than 2 km (1.2 mi) west-north-west of the River Mersey at New Ferry. The area is situated at an elevation of between 20–60 m 66–197 ft above sea level.
In 1801, Bebington was a small country hamlet with a population of only 273, situated on the main road connecting Chester and Birkenhead, and then via ferry to Liverpool. Up to 30 horse-drawn coaches would pass by each day. By 1840, the Birkenhead to Chester railway was running and in 1844 the New Chester Road opened and Bebington lost its coaching traffic.
In 1838, the footprints of an archosaur later called the Chirotherium storetonese were found in a sandstone bed at Storeton Quarry. Examples can be seen at the Liverpool Museum and at Christ Church within the parish of Higher Bebington. Also a small example can be seen at Higher Bebington Junior School, in their reception area.
Stone quarried at Bebington was used for the construction of Birkenhead Town Hall, some of the villas around Birkenhead and Rock Parks and most famously of all the Empire State Building in New York City. The stone is considered to be a high quality sandstone which is creamy in appearance. The quarries were eventually filled in with debris removed during the construction of the two Mersey Tunnels.
Mayer Hall, in Lower Bebington village, was formerly an art gallery built by Bebington philanthropist Joseph Mayer,[9] a noted antiquarian, whose collection of Anglo-Saxon antiquaries helped in the development of British archaeology. He made Pennant House his home. It is still a community resource and boasts many of its original features.
Setup Of This Weather Station
 Anemometer.
Mounting the anemometer can be a challenge for new weather station owners. According to CWOP Weather Station Guide And the UK Met Office Spot-On Guide, ideally an anemometer should be mounted 33 feet off the ground in an open area. So, if you don't own a ladder, now is a good time to borrow one.
Before we discuss how I mounted mine, we want to talk options. The anemometer can be mounted on tripod on the ground (using Guy Wires) or on a structure using a pole and straps. The pole can be aluminum, steel, or PVC piping.
Since my VP2 is cabled, I have a maximum cable length of 100 Metres. I decided to mount the sensor on a 20 feet scaffolting tube. The tube is mounted 12 feet from the ground via 3 heavy duty T & K Brackets rawbolted into conrete injectd brickwork. Don't forget to check for level and correct orientation with a compass before setting the sensor into position!
I know Davis shows the anemometer mounted to the ISS, but putting an anemometer down low is not a good way to measure wind and putting the ISS up high is not a good way to measure temperature/humidity & Rainfall. This is why Davis provides a long cable so you can separate the anemometer and put it up high.
Mounting to the house can present some challenges of it's own. Not only is the roof higher then most people are comfortable with, but there's the challenge of attaching the anemometer somehow to something and get it up there.
I strongly recommend you don't start putting holes in your roof.
along with the mounting of the wind sensor, I decided to mount the solar sensor/Sunshine recorder on a modified plate to get best clearance an visual of the sky.
Above is a image of the setup before the sunshine recorder was re positioned.
 Thermo/Hydro Sensor's
According to the CWOP Weather Station Guide, and the Met office Spot-on Guide, ideally thermometer and hygrometer sensors should be mounted 5 feet/1.2 metres off the ground in an open area, at least 100 feet from areas of concrete or asphalt. The sensor should have a radiation shield to protect from the heat of the sun and good ventilation. Of course, living in an urban environment won't allow for optimal placement.
Since the Davis integrated sensor suite (ISS) is a cabled system and has the radiation shield built in, I mounted the ISS above the grass in the middle of the garden sheltered from the sun.
The rain guage in use on this ISS is not currently in use and it stands as a backup.
I opted for - and strongly recommend - the 24-hour fan aspirated version of the VP2. This prevents buildup of an air pocket in the radiation shield during calm days. It also pulls air over the sensor on hot summer days, allowing for a much more accurate reading.
Above is the ISS unit before re positioning.
 Rain Guage
The self-tipping rain gauge is pretty self-explanatory for mounting. You want to make sure it's in an unobstructed spot, with good drainage, securely mounted, and as level as possible. I suggest a spot that's easily accessible because you'll want to clean it once a month or so.
Ours is mounted via a seperate external unit sat on the ground for optimum acuracy.
 Sunshine Recorder
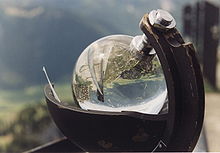
A sunshine recorder is a device that records the amount of Sunshine at a given location or region at any time. The results provide information about the weather and climate as well as the temperature of a geographical area. It has also been called a heliograph.
The photo pictured above is a The Campbell - Stokes recorder sometimes called a Stokes sphere) is a type of sunshine recorder. It was invented by John Francis Campbell in 1853 and modified in 1879 by Sir George Gabriel Stokes. The original design by Campbell consisted of a glass sphere set into a wooden bowl with the sun burning a trace on the bowl. Stokes's refinement was to make the housing out of metal and to have a card holder set behind the sphere.
The unit is designed to record the hours of bright sunshine which will burn a hole through the card. This basic unit is still in use today with very little change.
Our sensor is electronic and is mounted high up in the air along side the wind sensor
About This Website
This site is a template design by CarterLake.org with PHP conversion by Saratoga-Weather.org.
Special thanks go to Kevin Reed at TNET Weather for his work on the original Carterlake templates, and his design for the common website PHP management.
Special thanks to Mike Challis of Long Beach WA for his wind-rose generator, Theme Switcher and CSS styling help with these templates.
Special thanks go to Ken True of Saratoga-Weather.org for the AJAX conditions display, dashboard and integration of the TNET Weather common PHP site design for this site.
Template is originally based on Designs by Haran.
This template is XHTML 1.0 compliant. Validate the XHTML and CSS of this page.
